導(dǎo)言
一般控件(比如GridView)顯示數(shù)據(jù)的時候?qū)?shù)據(jù)只能讀取,而需要處理數(shù)據(jù)的功能是非常常見的.典型的情況是為每行數(shù)據(jù)添加一個Button, LinkButton, 或ImageButton . 當點擊這些button時,數(shù)據(jù)會PostBack,執(zhí)行一些服務(wù)器端的代碼. 一條條的編輯或刪除數(shù)據(jù)是最常見的情況.實際上,編輯和刪除是如此常見,從概述插入��、更新和刪除數(shù)據(jù) 開始, 我們可以看到GridView, DetailsView, 和 FormView可以零代碼的完成這些功能.
除了編輯和刪除button,GridView, DetailsView, and FormView 也可以包含一些執(zhí)行自定義服務(wù)器端代碼的Buttons, LinkButtons, 或 ImageButtons .在這一章我們來看看如何向一個GridView 或 DetailsView 里添加自定義的button.我們還將創(chuàng)建一個根據(jù)supplier進行分頁的頁面.對每個給定的supplier,FormView會顯示它的相關(guān)信息,外加一個Button .點擊這個Button 時,所有相關(guān)products會被標記為停止使用.另外,GridView 會列出選定的supplier提供的所有product ,并且每一行會包含“Increase Price”和“Discount Price”兩個Button.這兩個Button用來提高或降低10%的product單價(見圖一).

圖 1: FormView和GridView 都包含了執(zhí)行自定義行為的Button
第一步: 添加一個Button 教程頁
在研究如何添加自定義button之前,我們先花一點時間在網(wǎng)站里創(chuàng)建一些頁,這些頁會在本指南里用到.先添加一個名為CustomButtons的文件夾,然后添加如下的兩個頁.添加頁的時候確保每頁都選擇了Site.master作為母板頁.
Default.aspx
CustomButtons.aspx
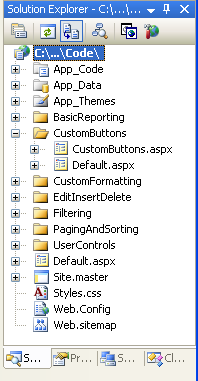
圖 2: 添加本指南需要的頁面
象其它文件夾一樣,CustomButtons 文件夾里的Default.aspx 用來列出教程章節(jié).記得SectionLevelTutorialListing.ascx 這個用戶控件提供了這個功能.因此,從解決方案瀏覽里將這個用戶控件拖到頁面上.
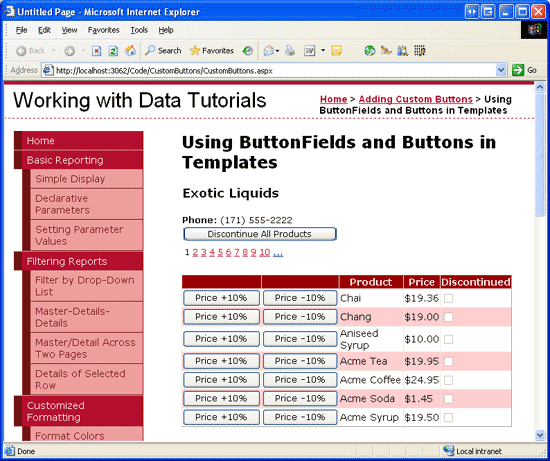
圖 3: 添加SectionLevelTutorialListing.ascx 用戶控件 到Default.aspx
最后,將這些頁的地址加到 Web.sitemap 的條目里.在Paging and Sorting siteMapNode>之后添加下面的標記.
siteMapNode
 title="Adding Custom Buttons"
 description="Samples of Reports that Include Buttons for Performing
 Server-Side Actions"
 url="~/CustomButtons/Default.aspx">
 siteMapNode
 title="Using ButtonFields and Buttons in Templates"
 description="Examines how to add custom Buttons, LinkButtons,
 or ImageButtons as ButtonFields or within templates."
 url="~/CustomButtons/CustomButtons.aspx" />
/siteMapNode>
修改完Web.sitemap后,在瀏覽器里看一下本教程站點,現(xiàn)在左邊的菜單里包含了編輯,插入,刪除教程的項.
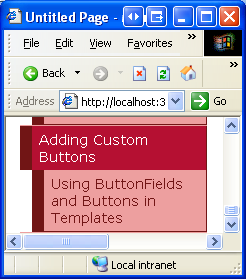
圖 4: Site Map包含了添加自定義button教程
第二步: 添加一個列出 Supplier的FormView
我們首先來添加一個列出suppliers的FormView .正如在導(dǎo)言里討論的那樣,FormView根據(jù)supplier分頁,并在GridView顯示supplier 提供的所有product .另外FormView 會包含一個Button .當點擊時,所有相關(guān)products會被標記為停止使用.在我們?yōu)镕ormView添加自定義button之前,我們首先創(chuàng)建顯示supplier 信息的FormView .
打開CustomButtons文件夾里的CustomButtons.aspx 頁,從工具箱里拖一個FormView進來,將FormView的ID設(shè)置為Suppliers.打開FormView的智能標簽,創(chuàng)建一個名為SuppliersDataSource的ObjectDataSource.
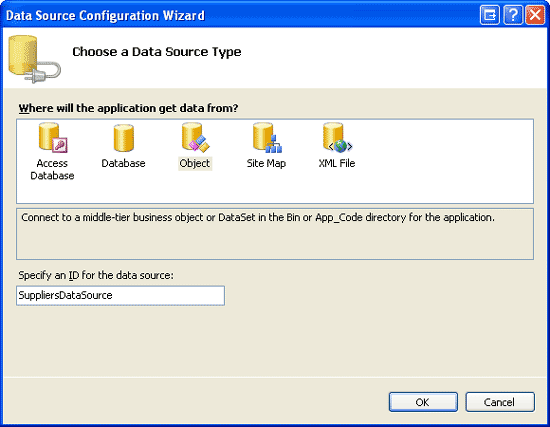
圖 5: 創(chuàng)建一個名為SuppliersDataSource的ObjectDataSource
選擇SuppliersBLL 類的GetSuppliers()方法配置ObjectDataSource(見圖6).由于這個FormView沒有提供修改supplier 信息的界面,所以在UPDATE 標簽的下拉列表里選擇None.
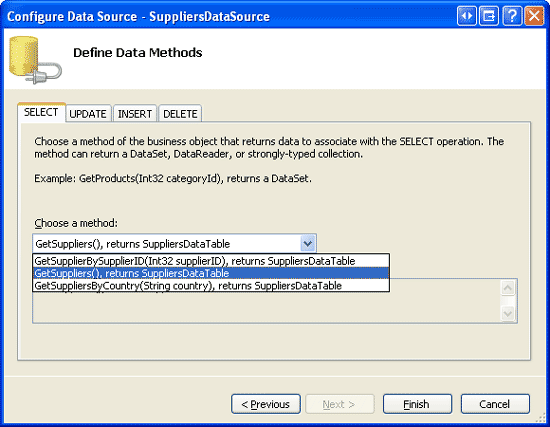
圖 6: 使用 SuppliersBLL 類的GetSuppliers() 方法配置數(shù)據(jù)源
數(shù)據(jù)源配置完成后,Visual Studio會生成一個InsertItemTemplate,一個EditItemTemplate和一個FormView的ItemTemplate.去掉InsertItemTemplate 和EditItemTemplate ,修改ItemTemplate,讓它只顯示supplier的公司名,電話號碼.最后,在智能標簽里選中Enable Paging checkbox 或者設(shè)置AllowPaging 屬性為True.完成這些后,你的聲明標記看起來應(yīng)該和以下差不多:
asp:FormView ID="Suppliers" runat="server" DataKeyNames="SupplierID"
 DataSourceID="SuppliersDataSource" EnableViewState="False" AllowPaging="True">
 ItemTemplate>
 h3>
 asp:Label ID="CompanyName" runat="server"
 Text='%# Bind("CompanyName") %>' />
 /h3>
 b>Phone:/b>
 asp:Label ID="PhoneLabel" runat="server" Text='%# Bind("Phone") %>' />
 /ItemTemplate>
/asp:FormView>
asp:ObjectDataSource ID="SuppliersDataSource" runat="server"
 OldValuesParameterFormatString="original_{0}"
 SelectMethod="GetSuppliers" TypeName="SuppliersBLL">
/asp:ObjectDataSource>
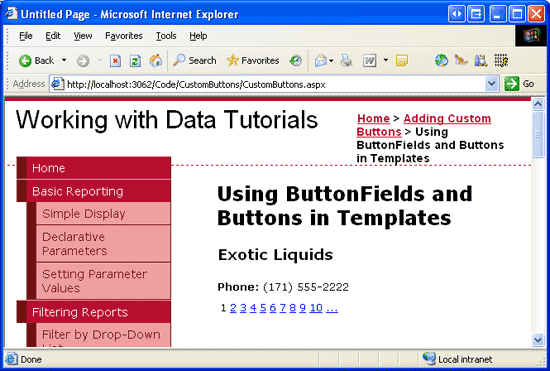
圖 7: FormView列出當前選定的Supplier的CompanyName and Phone
第三步 : 添加一個GridView,用來列出某個Supplier的所有Product
在添加“Discontinue All Products”Button 前,先在FormView 下面添加一個GridView . 設(shè)置ID 為SuppliersProducts,添加一個名為SuppliersProductsDataSource的ObjectDataSource .
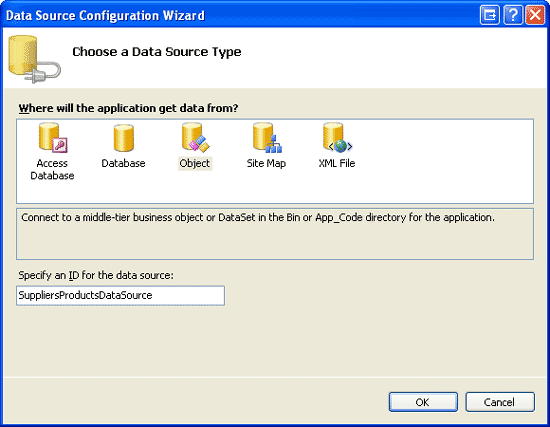
圖 8: 創(chuàng)建一個名為SuppliersProductsDataSource的ObjectDataSource
選擇ProductsBLL 類的GetProductsBySupplierID(supplierID)方法配置ObjectDataSource(見圖9).雖然GridView 允許修改product的價格,但是并不使用的GridView自帶的編輯或刪除功能.因此在UPDATE, INSERT, and DELETE 標簽的下拉列表里都選擇None.
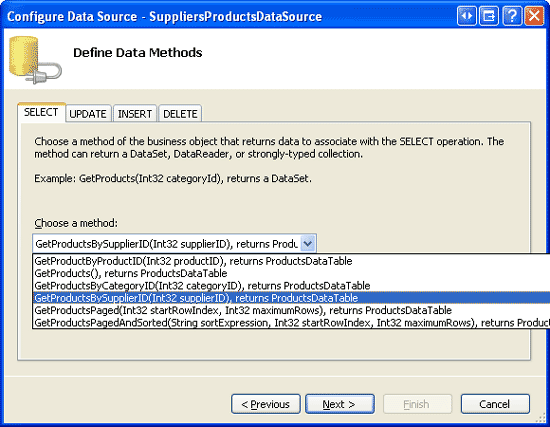
圖 9: 使用ProductsBLL 類的GetProductsBySupplierID(supplierID) 方法配置數(shù)據(jù)源
由于GetProductsBySupplierID(supplierID)有一個輸入?yún)?shù),ObjectDataSource向?qū)崾疚覀兣渲眠@個參數(shù).為了將SupplierID 從FormView傳過來,在參數(shù)來源的下來列表里選擇Control,在ControlID 下拉列表里選擇Suppliers (在第二步里創(chuàng)建的FormView 的ID).
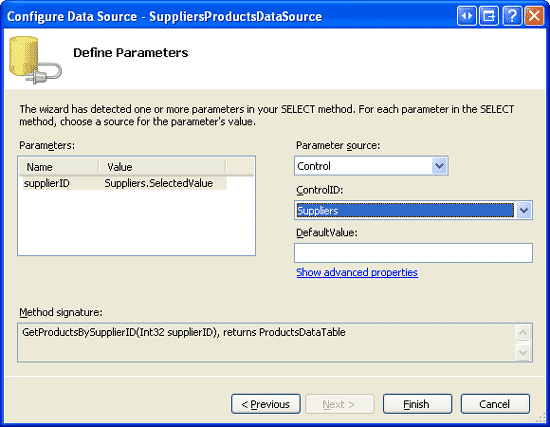
圖 10: 指定 supplierID 參數(shù)的來源為Suppliers FormView
完成了ObjectDataSource 向?qū)Ш?GridView 里的每一行product會包含一個BoundField 和一個CheckBoxField . 我們來精簡一下,只顯示Discontinued CheckBoxField,ProductName 和UnitPrice .我們修改UnitPrice 列的格式為貨幣. 你的GridView 和SuppliersProductsDataSource ObjectDataSource的聲明標記看起來應(yīng)該和下面差不多:
asp:GridView ID="SuppliersProducts" AutoGenerateColumns="False"
 DataKeyNames="ProductID" DataSourceID="SuppliersProductsDataSource"
 EnableViewState="False" runat="server">
 Columns>
 asp:BoundField DataField="ProductName" HeaderText="Product"
 SortExpression="ProductName" />
 asp:BoundField DataField="UnitPrice" HeaderText="Price"
 SortExpression="UnitPrice" DataFormatString="{0:C}"
 HtmlEncode="False" />
 asp:CheckBoxField DataField="Discontinued" HeaderText="Discontinued"
 SortExpression="Discontinued" />
 /Columns>
/asp:GridView>

asp:ObjectDataSource ID="SuppliersProductsDataSource" runat="server"
 OldValuesParameterFormatString="original_{0}"
 SelectMethod="GetProductsBySupplierID" TypeName="ProductsBLL">
 SelectParameters>
 asp:ControlParameter ControlID="Suppliers" Name="supplierID"
 PropertyName="SelectedValue" Type="Int32" />
 /SelectParameters>
/asp:ObjectDataSource>
現(xiàn)在我們的顯示了一個主/從表,用戶通過在上面的FormView 里選擇一個supplier ,在下方的GridView 里就可以看到這個supplier 提供的products.
圖11是在FormView里選擇Tokyo Traders supplier 的截圖.
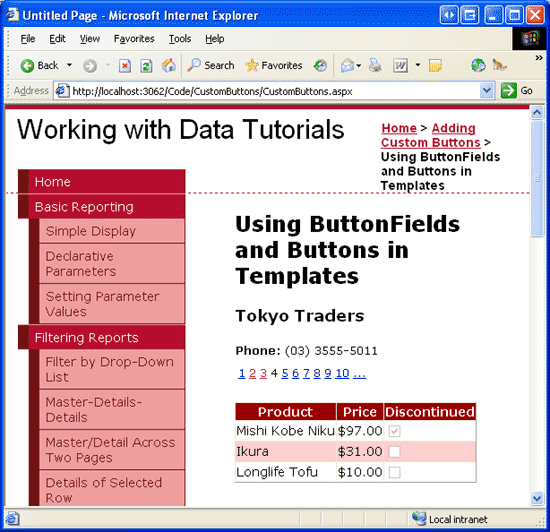
圖 11: 在GridView顯示選定的Supplier的產(chǎn)品
第四步: 創(chuàng)建DAL和BLL層的停止使用Supplier的所有Products 的方法
在FormView 添加discontinue button前,我們首先需要在DAL 和BLL 里添加完成這個功能的方法.這個方法的名字為DiscontinueAllProductsForSupplier(supplierID). 當點擊FormView的Button 時,我們會調(diào)用Business Logic Layer里的這個方法,并將選定的supplier的SupplierID傳進去.BLL 會繼續(xù)調(diào)用Data Access Layer的相關(guān)方法,這個方法會向數(shù)據(jù)庫提交一個停止使用選定的supplier的products的UPDATE語句
象在以前的教程里所做的那樣,我們使用自底向上的方法,首先創(chuàng)建DAL 的方法,然后是BLL ,最后在 ASP.NET page里實現(xiàn)這個功能.打開App_Code/DAL文件夾里的Northwind.xsd ,為ProductsTableAdapter 添加一個新方法(右鍵點擊ProductsTableAdapter ,選擇Add Query).這樣彈出TableAdapter Query 的配置向?qū)?首先指定DAL 需要使用的SQL .
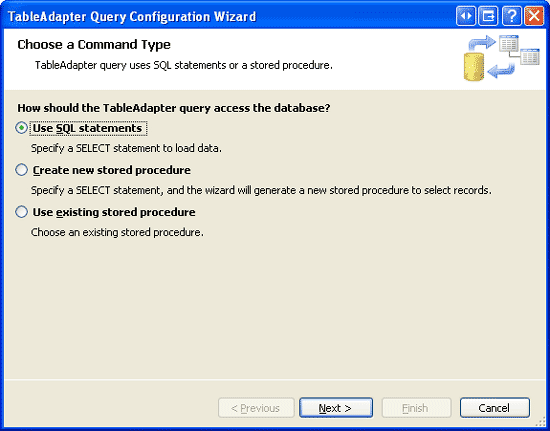
圖 12: 使用SQL Statement創(chuàng)建DAL 方法
接著,向?qū)儐栁覀儎?chuàng)建哪種類型的query .由于DiscontinueAllProductsForSupplier(supplierID)需要更新Products表,為指定的supplierID 的所有products的Discontinued 字段設(shè)置為1,因此我們需要創(chuàng)建一個更新數(shù)據(jù)的query .
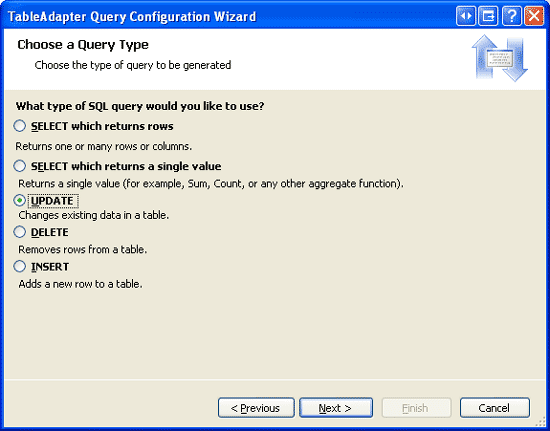
圖 13: 選擇UPDATE Query的類型
下一個向?qū)э@示的窗口提供了TableAdapter的已經(jīng)存在的UPDATE 語句,它會updates 在Products DataTable定義的所有的字段.用下面的語句替換它:
UPDATE [Products] SET
Discontinued = 1
WHERE SupplierID = @SupplierID
輸入以上語句后點Next,最后一個向?qū)Т翱谛枰斎朐摲椒ǖ拿帧狣iscontinueAllProductsForSupplier.完成向?qū)Ш簏cFinish button.當你回到DataSet 設(shè)計器時你應(yīng)該可以在ProductsTableAdapter 看到名為DiscontinueAllProductsForSupplier(@SupplierID)的方法.
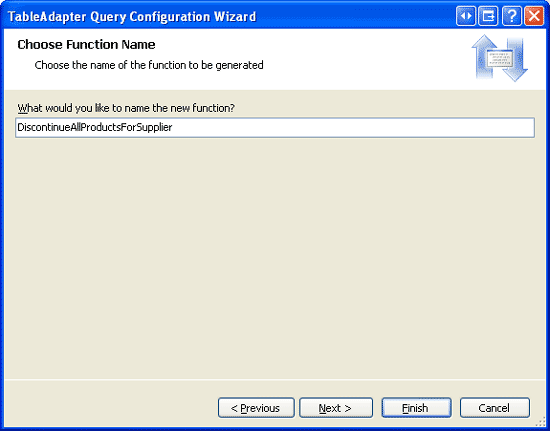
圖 14: 為 DAL 的方法取名為 DiscontinueAllProductsForSupplier
完成Data Access Layer里的DiscontinueAllProductsForSupplier(supplierID)方法后,我們下一步的任務(wù)是創(chuàng)建Business Logic Layer里的相應(yīng)的方法.打開ProductsBLL 類文件,添加以下內(nèi)容:
public int DiscontinueAllProductsForSupplier(int supplierID)
{
 return Adapter.DiscontinueAllProductsForSupplier(supplierID);
}
這個方法僅僅是調(diào)用DAL里的DiscontinueAllProductsForSupplier(supplierID)方法,并傳遞提供的supplierID 參數(shù).如果有一些業(yè)務(wù)規(guī)則規(guī)定僅僅允許在一定的條件下supplier的products 才能被停止使用,那么這些規(guī)則應(yīng)該寫在這里(BLL).
注意:和ProductsBLL 類的UpdateProduct重載不一樣,DiscontinueAllProductsForSupplier(supplierID)的簽名不包括DataObjectMethodAttribute 屬性(System.ComponentModel.DataObjectMethodAttribute(System.ComponentModel.DataObjectMethodType.Update, Boolean)>).這個將DiscontinueAllProductsForSupplier(supplierID) 方法從ObjectDataSource的配置數(shù)據(jù)源向?qū)У腢PDATE標簽里的下拉列表中排除.我之所以忽略這個屬性是因為我們會在ASP.NET page里直接通過event handler 調(diào)用DiscontinueAllProductsForSupplier(supplierID)方法.
第五步: 為FormView添加一個“Discontinue All Products” Button
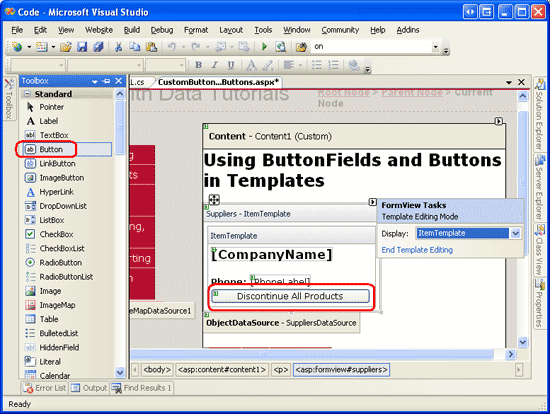
完成了BLL 和 DAL 里的DiscontinueAllProductsForSupplier(supplierID)方法后,我們來做實現(xiàn)停止使用選定的supplier的所有product的功能最后一步:為 FormView的 ItemTemplate添加Button .我們將這個Button 添加在supplier的phone number下,Text為“Discontinue All Products”,ID為DiscontinueAllProductsForSupplier.你可以通過FormView的智能標簽里的Edit Templates 來添加這個Button (見圖15),或直接修改代碼.
圖 15: 為FormView的ItemTemplate添加 “Discontinue All Products” Button
當用戶點擊這個Button 時,頁面會回發(fā),FormView的ItemCommand event被激發(fā).我們可以為這個事件創(chuàng)建一個event handler ,用來在Button 被點擊時執(zhí)行自定義代碼.注意,任何時候FormView里的任何Button, LinkButton, 或 ImageButton被點擊時,ItemCommand 事件都會被激發(fā).這意味著當用戶在FormView里從一個頁面跳到另一個頁面時,ItemCommand 事件會被激發(fā).當用戶點擊一個支持inserting, updating, 或 deleting的FormView里的New, Edit, 或 Delete 時,ItemCommand 事件會被激發(fā).
既然無論點擊什么button時, ItemCommand 都會被激發(fā),那么在event handler里我們需要判斷是“Discontinue All Products” Button 被點擊了還是其它的button.為了達到這個目的,我們可以通過設(shè)置Button 的CommandName來識別. 當Button 被點擊后,CommandName 的值被傳到ItemCommand 的event handler,我們通過這個值來判斷被點擊的button是否是“Discontinue All Products” Button.設(shè)置“Discontinue All Products” Button的CommandName 為“DiscontinueProducts”.
最后我們在客戶端增加一個確認框來確保用戶真的想停止使用選擇的supplier的所有product.和我們在為刪除數(shù)據(jù)添加客戶端確認 里看到的一樣,這個可以用JavaScript來完成. 設(shè)置Button 的OnClientClick屬性為“return confirm('This will mark _all_ of this supplier/'s products as discontinued. Are you certain you want to do this?');”
asp:FormView ID="Suppliers" runat="server" DataKeyNames="SupplierID"
 DataSourceID="SuppliersDataSource" EnableViewState="False"
 AllowPaging="True">
 ItemTemplate>
 h3>asp:Label ID="CompanyName" runat="server"
 Text='%# Bind("CompanyName") %>'>/asp:Label>/h3>
 b>Phone:/b>
 asp:Label ID="PhoneLabel" runat="server" Text='%# Bind("Phone") %>' />
 br />
 asp:Button ID="DiscontinueAllProductsForSupplier" runat="server"
 CommandName="DiscontinueProducts" Text="Discontinue All Products"
 OnClientClick="return confirm('This will mark _all_ of this supplier/'s
 products as discontinued. Are you certain you want to do this?');" />
 /ItemTemplate>
/asp:FormView>
下面,為FormView的 ItemCommand 事件創(chuàng)建event handler . 在這個event handler 里我們需要首先判斷“Discontinue All Products”Button是否被點擊了.如果是,我們就需要創(chuàng)建一個ProductsBLL 類的實例然后調(diào)用DiscontinueAllProductsForSupplier(supplierID)方法,并將FormView里選定的SupplierID 傳過去.
protected void Suppliers_ItemCommand(object sender, FormViewCommandEventArgs e)
{
 if (e.CommandName.CompareTo("DiscontinueProducts") == 0)
 {
 // The "Discontinue All Products" Button was clicked.
 // Invoke the ProductsBLL.DiscontinueAllProductsForSupplier(supplierID) method

 // First, get the SupplierID selected in the FormView
 int supplierID = (int)Suppliers.SelectedValue;

 // Next, create an instance of the ProductsBLL class
 ProductsBLL productInfo = new ProductsBLL();

 // Finally, invoke the DiscontinueAllProductsForSupplier(supplierID) method
 productInfo.DiscontinueAllProductsForSupplier(supplierID);
 }
}
注意:在FormView 里當前選定的supplier 的SupplierID 可以通過FormView的 SelectedValue property屬性獲取.SelectedValue 屬性返回FormView里顯示的記錄的第一個data key的值.FormView的DataKeyNames property在綁定ObjectDataSource 到FormView 時(第二步)會自動的被設(shè)置為SupplierID .
ItemCommand event handler 創(chuàng)建完后,花點時間測試一下這個頁面.瀏覽Cooperativa de Quesos 'Las Cabras' supplier (在我這是FormView 里的第五個supplier ).這個supplier 提供兩種product, Queso Cabrales and Queso Manchego La Pastora,兩個都沒有停止使用的.
想象一下 Cooperativa de Quesos 'Las Cabras' 歇業(yè)了,因此它的產(chǎn)品都要被停止使用.點擊“Discontinue All Products” Button.會彈出一個確認的對話框.
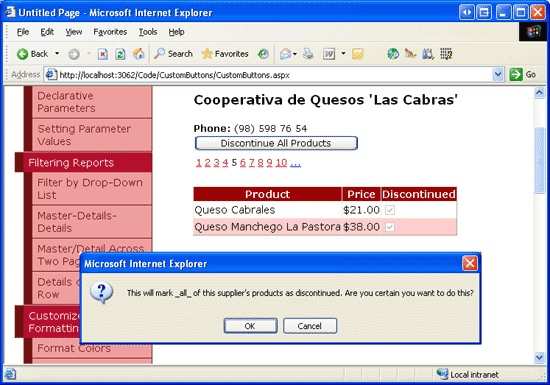
圖 16: Cooperativa de Quesos 'Las Cabras' 供應(yīng) 兩種有效的產(chǎn)品
如果在確定對話框里點擊OK,表單提交就會繼續(xù),ormView的ItemCommand 事件會被激發(fā).然后我們創(chuàng)建的event handler會執(zhí)行,調(diào)用DiscontinueAllProductsForSupplier(supplierID)方法,停止使用Queso Cabrales 和 Queso Manchego La Pastora這兩個產(chǎn)品.
如果你禁用了GridView的view state,每次postback時GridView 都會重新綁定,因此這兩種product被停止使用的狀態(tài)馬上就能顯示出來(見圖17).而如果沒有禁用GridView的view state,你需要手動再次綁定數(shù)據(jù).
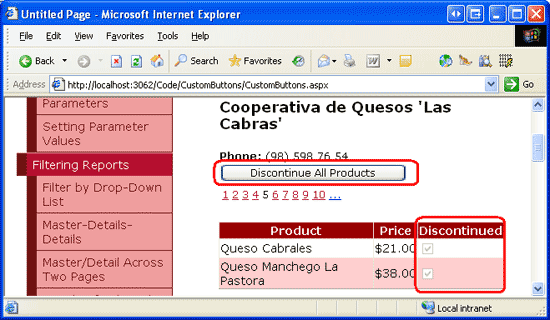
圖 17: 點擊 “Discontinue All Products” Button后, Supplier的 Products被更新
第六步: 為調(diào)整Product的價格,在Business Logic Layer 創(chuàng)建一個UpdateProduct
和FormView里的“Discontinue All Products” Button 一樣,為了在GridView 里添加提高或者降低product 的價格的button,我們首先添加Data Access Layer and Business Logic Layer 的方法.由于我們在DAL里已經(jīng)有一個更新單個產(chǎn)品記錄的方法,我們可以通過在BLL創(chuàng)建UpdateProduct 的重載方法來實現(xiàn)這個功能.
我們以前的UpdateProduct 包括一些product 字段作為輸入值,我們可以為指定的product更新這些字段.我們將做少量修改,傳遞ProductID 和調(diào)整單價的百分比.因為不用再測定當前product 的單價,所以這樣的方法會讓我們在ASP.NET page 的cs文件里的代碼變的更簡潔.
UpdateProduct 在本指南中使用的重載方法如下:
public bool UpdateProduct(decimal unitPriceAdjustmentPercentage, int productID)
{
 Northwind.ProductsDataTable products = Adapter.GetProductByProductID(productID);
 if (products.Count == 0)
 // no matching record found, return false
 return false;
 Northwind.ProductsRow product = products[0];
 // Adjust the UnitPrice by the specified percentage (if it's not NULL)
 if (!product.IsUnitPriceNull())
 product.UnitPrice *= unitPriceAdjustmentPercentage;
 // Update the product record
 int rowsAffected = Adapter.Update(product);
 // Return true if precisely one row was updated, otherwise false
 return rowsAffected == 1;
}
這個方法通過DAL的GetProductByProductID(productID)方法獲取指定product 的信息.它會檢查product的單價是否是空值.如果是,這個價格就不被更改.如果不是,product的UnitPrice 將根據(jù)指定的百分比更改(unitPriceAdjustmentPercent)
第七步: 在GridView里添加升價和降價的Button
GridView (和DetailsView)都是字段的集合.除了BoundFields, CheckBoxFields, and TemplateFields這幾個字段外,ASP.NET還包含ButtonField.就象它的名字一樣,ButtonField提供一個Button, LinkButton, 或 ImageButton列.和FormView一樣,點擊GridView 里的任何一個button— 分頁,編輯或刪除,排序等— 頁面都會回發(fā) ,并激發(fā)GridView的RowCommand event.
ButtonField 有一個CommandName 屬性,可以用來指派特定的值給每個Button的CommandName 屬性.象FormView一樣,CommandName 的值用來在RowCommand event handler 里判斷哪個button被點擊了.
現(xiàn)在我們來為GridView添加兩個ButtonField,一個的text為“Price +10%” ,另外一個的text為“Price -10%”. 點擊GridView的智能標簽里的Edit Columns link ,在左上的列表里選擇ButtonField 類,點添加.
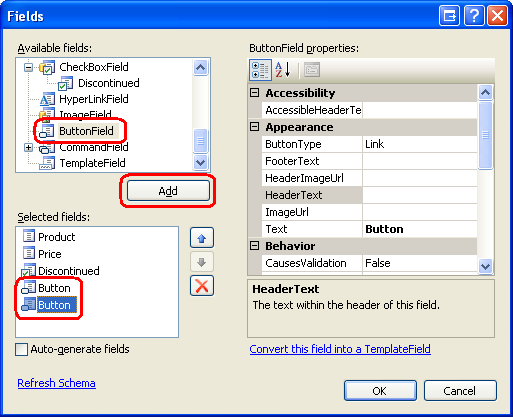
圖 18: 為GridView添加兩個ButtonField
移動這兩個ButtonField 到GridView 的前兩列.分別設(shè)置ButtonField的text為 “Price +10%” and “Price -10%”,CommandName 為“IncreasePrice” and “DecreasePrice”,.默認情況下,ButtonField 里的button為LinkButtons,這個是可通過ButtonField的ButtonType property屬性來修改的.我們將這兩個ButtonField設(shè)置為常規(guī)的push button.因此,設(shè)置ButtonType 屬性為Button.圖19顯示了設(shè)置完成后的Fields 對話框的樣子.而后面一個圖則為GridView的頁面代碼.
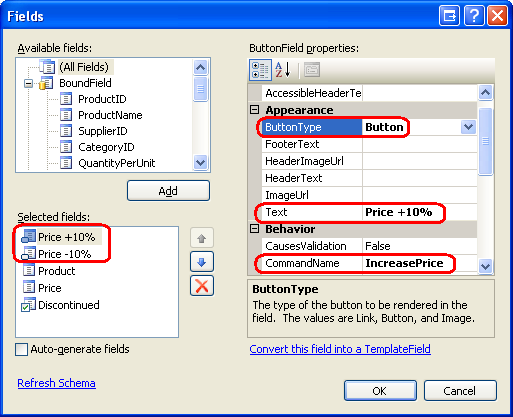
圖 19: 配置 ButtonField的 Text, CommandName, and ButtonType 屬性
asp:GridView ID="SuppliersProducts" runat="server" AutoGenerateColumns="False"
 DataKeyNames="ProductID" DataSourceID="SuppliersProductsDataSource"
 EnableViewState="False">
 Columns>
 asp:ButtonField ButtonType="Button" CommandName="IncreasePrice"
 Text="Price +10%" />
 asp:ButtonField ButtonType="Button" CommandName="DecreasePrice"
 Text="Price -10%" />
 asp:BoundField DataField="ProductName" HeaderText="Product"
 SortExpression="ProductName" />
 asp:BoundField DataField="UnitPrice" HeaderText="Price"
 SortExpression="UnitPrice" DataFormatString="{0:C}"
 HtmlEncode="False" />
 asp:CheckBoxField DataField="Discontinued" HeaderText="Discontinued"
 SortExpression="Discontinued" />
 /Columns>
/asp:GridView>
創(chuàng)建ButtonField完成后,最后一步是為GridView的RowCommand 事件創(chuàng)建event handler .當“Price +10%”或“Price -10%”button被點擊時,這個event handler需要判斷被點擊的那一行的ProductID ,然后調(diào)用ProductsBLL 類的UpdateProduct 方法,并將UnitPrice 的調(diào)整折扣和ProductID傳進去.下來的代碼會完成以上工作:
protected void SuppliersProducts_RowCommand(object sender, GridViewCommandEventArgs e)
{
 if (e.CommandName.CompareTo("IncreasePrice") == 0 ||
 e.CommandName.CompareTo("DecreasePrice") == 0)
 {
 // The Increase Price or Decrease Price Button has been clicked
 // Determine the ID of the product whose price was adjusted
 int productID =
 (int)SuppliersProducts.DataKeys[Convert.ToInt32(e.CommandArgument)].Value;
 // Determine how much to adjust the price
 decimal percentageAdjust;
 if (e.CommandName.CompareTo("IncreasePrice") == 0)
 percentageAdjust = 1.1M;
 else
 percentageAdjust = 0.9M;

 // Adjust the price
 ProductsBLL productInfo = new ProductsBLL();
 productInfo.UpdateProduct(percentageAdjust, productID);
 }
}
為了判斷被點擊“Price +10%” or “Price -10%” button 的那一行的ProductID ,我們需要用到GridView的DataKeys 集合.這個集合包含了GridView 的行的所有值.由于GridView在綁定到ObjectDataSource 時,DataKeyNames 被Visual Studio設(shè)置為ProductID ,DataKeys(rowIndex).Value 提供了指定rowIndex的ProductID .
ButtonField 會將被點擊的button所在row 的rowIndex 自動傳到e.CommandArgument 參數(shù)里.因此,我們用Convert.ToInt32(SuppliersProducts.DataKeys(Convert.ToInt32(e.CommandArgument)).Value)來獲取被點擊“Price +10%” or “Price -10%” button的行的ProductID .
和“Discontinue All Products” button里一樣,如果你禁用了GridView的view state屬性,每次postback時GridView 都會重新綁定.如果你這么做,你需要手動再次綁定.
圖20顯示當瀏覽Grandma Kelly's Homestead提供的product的頁.圖21顯示當Grandma's Boysenberry Spread 的“Price +10%” button 被點擊了兩次和Northwoods Cranberry Sauce的“Price -10%” button被點擊了一次的頁面.
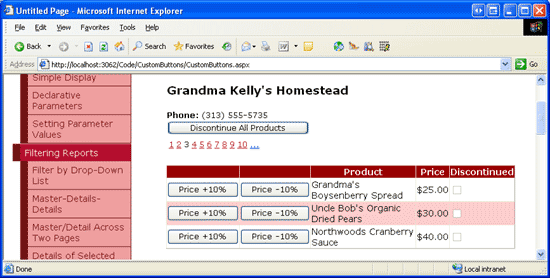
圖20: GridView 包含“Price +10%” 和 “Price -10%” 兩個Buttons
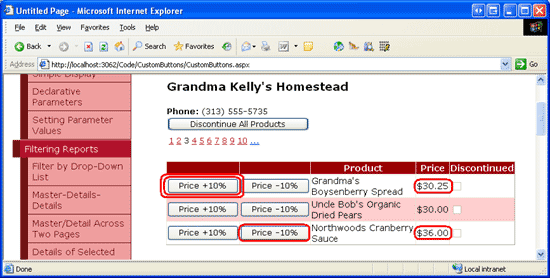
圖 21: 第一和第三個產(chǎn)品的價格通過“Price +10%” and “Price -10%” Buttons更新
注意:GridView (和DetailsView)同樣可以將Buttons,LinkButtons或ImageButtons 加到TemplateFields里.和BoundField一樣,這些Button被點擊時會產(chǎn)生回發(fā),觸發(fā)GridView的RowCommand 事件.當添加button到 TemplateField里時,button的CommandArgument 沒有想使用ButtonFields一樣,被自動設(shè)置為row 的index .如果你需要在RowCommand 的event handler里判斷點擊的button所在行的index ,你需要在TemplateField的頁面代碼里使用以下代碼來設(shè)置button的CommandArgument 屬性:
asp:Button runat="server" ... CommandArgument='%# CType(Container, GridViewRow).RowIndex %>' />.
總結(jié)
GridView, DetailsView, 和FormView都可以包含Buttons, LinkButtons, 或 ImageButtons.這些button被點擊時,頁面回發(fā),并激發(fā)FormView 和DetailsView 的ItemCommand 事件,GridView的RowCommand 事件.這些控件都有內(nèi)置的處理普通命令的功能,比如刪除或編輯一條記錄.然而我們一樣可以使用執(zhí)行自定義代碼的button.
為了達到這個目的,我們需要為ItemCommand 或 RowCommand 創(chuàng)建一個event handler .在這個event handler 里我們首先檢查CommandName 的值來判斷哪個button被點擊了,然后執(zhí)行相應(yīng)的自定義代碼.在本指南里我們看到了如何使用button和ButtonField來停止使用指定supplier 的所有產(chǎn)品,和提高或降低特定product 的10%的價格.
祝編程快樂!
作者簡介
Scott Mitchell����,著有六本ASP/ASP.NET方面的書,是4GuysFromRolla.com的創(chuàng)始人��,自1998年以來一直應(yīng)用 微軟Web技術(shù)��。Scott是個獨立的技術(shù)咨詢顧問,培訓(xùn)師�,作家,最近完成了將由Sams出版社出版的新作�����,24小時內(nèi)精通ASP.NET 2.0�。他的聯(lián)系電郵為mitchell@4guysfromrolla.com,也可以通過他的博客http://scottonwriting.net/與他聯(lián)系�。
您可能感興趣的文章:- asp.net下gridview 批量刪除的實現(xiàn)方法
- asp.net gridview 72般絕技
- asp.net gridview代碼綁定
- asp.net GridView控件中模板列CheckBox全選����、反選、取消
- asp.net GridView 刪除時彈出確認對話框(包括內(nèi)容提示)
- Asp.net GridView使用大全(分頁實現(xiàn))
- 在ASP.NET 2.0中操作數(shù)據(jù)之十:使用 GridView和DetailView實現(xiàn)的主/從報表
- 在ASP.NET 2.0中操作數(shù)據(jù)之十二:在GridView控件中使用TemplateField
- 在ASP.NET 2.0中操作數(shù)據(jù)之十五:在GridView的頁腳中顯示統(tǒng)計信息
- 在ASP.NET 2.0中操作數(shù)據(jù)之四十九:為GridView控件添加RadioButton
- 在ASP.NET 2.0中操作數(shù)據(jù)之五十:為GridView控件添加Checkbox
- 在ASP.NET 2.0中操作數(shù)據(jù)之五十一:從GridView的頁腳插入新記錄