前言
深度學習中有很多玩具數(shù)據(jù)�,mnist就是其中一個,一個人能否入門深度學習往往就是以能否玩轉mnist數(shù)據(jù)來判斷的���,在前面很多基礎介紹后我們就可以來實現(xiàn)一個簡單的手寫數(shù)字識別的網(wǎng)絡了
數(shù)據(jù)的處理
我們使用pytorch自帶的包進行數(shù)據(jù)的預處理
import torch
import torchvision
import torchvision.transforms as transforms
import numpy as np
import matplotlib.pyplot as plt

transform = transforms.Compose([
  transforms.ToTensor(),
  transforms.Normalize((0.5), (0.5))
])
trainset = torchvision.datasets.MNIST(root='./data', train=True, download=True, transform=transform)
trainloader = torch.utils.data.DataLoader(trainset, batch_size=32, shuffle=True,num_workers=2)
注釋:transforms.Normalize用于數(shù)據(jù)的標準化���,具體實現(xiàn)
mean:均值 總和后除個數(shù)
std:方差 每個元素減去均值再平方再除個數(shù)
norm_data = (tensor - mean) / std
這里就直接將圖片標準化到了-1到1的范圍,標準化的原因就是因為如果某個數(shù)在數(shù)據(jù)中很大很大��,就導致其權重較大����,從而影響到其他數(shù)據(jù),而本身我們的數(shù)據(jù)都是平等的�,所以標準化后將數(shù)據(jù)分布到-1到1的范圍,使得所有數(shù)據(jù)都不會有太大的權重導致網(wǎng)絡出現(xiàn)巨大的波動
trainloader現(xiàn)在是一個可迭代的對象�,那么我們可以使用for循環(huán)進行遍歷了,由于是使用yield返回的數(shù)據(jù)�����,為了節(jié)約內存
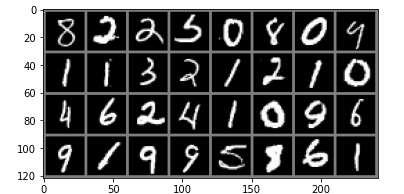
觀察一下數(shù)據(jù)
def imshow(img):
   img = img / 2 + 0.5 # unnormalize
   npimg = img.numpy()
   plt.imshow(np.transpose(npimg, (1, 2, 0)))
   plt.show()
# torchvision.utils.make_grid 將圖片進行拼接
imshow(torchvision.utils.make_grid(iter(trainloader).next()[0]))
構建網(wǎng)絡
from torch import nn
import torch.nn.functional as F
class Net(nn.Module):
def __init__(self):
super(Net, self).__init__()
self.conv1 = nn.Conv2d(in_channels=1, out_channels=28, kernel_size=5) # 14
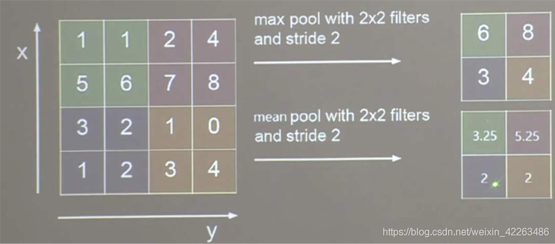
self.pool = nn.MaxPool2d(kernel_size=2, stride=2) # 無參數(shù)學習因此無需設置兩個
self.conv2 = nn.Conv2d(in_channels=28, out_channels=28*2, kernel_size=5) # 7
self.fc1 = nn.Linear(in_features=28*2*4*4, out_features=1024)
self.fc2 = nn.Linear(in_features=1024, out_features=10)
def forward(self, inputs):
x = self.pool(F.relu(self.conv1(inputs)))
x = self.pool(F.relu(self.conv2(x)))
x = x.view(inputs.size()[0],-1)
x = F.relu(self.fc1(x))
return self.fc2(x)
下面是卷積的動態(tài)演示

in_channels:為輸入通道數(shù) 彩色圖片有3個通道 黑白有1個通道
out_channels:輸出通道數(shù)
kernel_size:卷積核的大小
stride:卷積的步長
padding:外邊距大小
輸出的size計算公式
- h = (h - kernel_size + 2*padding)/stride + 1
- w = (w - kernel_size + 2*padding)/stride + 1
MaxPool2d:是沒有參數(shù)進行運算的
實例化網(wǎng)絡優(yōu)化器����,并且使用GPU進行訓練
net = Net()
opt = torch.optim.Adam(params=net.parameters(), lr=0.001)
device = torch.device("cuda:0" if torch.cuda.is_available() else "cpu")
net.to(device)
Net(
 (conv1): Conv2d(1, 28, kernel_size=(5, 5), stride=(1, 1))
 (pool): MaxPool2d(kernel_size=2, stride=2, padding=0, dilation=1, ceil_mode=False)
 (conv2): Conv2d(28, 56, kernel_size=(5, 5), stride=(1, 1))
 (fc1): Linear(in_features=896, out_features=1024, bias=True)
 (fc2): Linear(in_features=1024, out_features=10, bias=True)
)
訓練主要代碼
for epoch in range(50):
  for images, labels in trainloader:
    images = images.to(device)
    labels = labels.to(device)
    pre_label = net(images)
    loss = F.cross_entropy(input=pre_label, target=labels).mean()
    pre_label = torch.argmax(pre_label, dim=1)
    acc = (pre_label==labels).sum()/torch.tensor(labels.size()[0], dtype=torch.float32)
    net.zero_grad()
    loss.backward()
    opt.step()
  print(acc.detach().cpu().numpy(), loss.detach().cpu().numpy())
F.cross_entropy交叉熵函數(shù)

源碼中已經(jīng)幫助我們實現(xiàn)了softmax因此不需要自己進行softmax操作了
torch.argmax計算最大數(shù)所在索引值
acc = (pre_label==labels).sum()/torch.tensor(labels.size()[0], dtype=torch.float32)
# pre_label==labels 相同維度進行比較相同返回True不同的返回False��,True為1 False為0, 即可獲取到相等的個數(shù),再除總個數(shù)�����,就得到了Accuracy準確度了
預測
testset = torchvision.datasets.MNIST(root='./data', train=False, download=True, transform=transform)
testloader = torch.utils.data.DataLoader(testset, batch_size=128, shuffle=True,num_workers=2)
images, labels = iter(testloader).next()
images = images.to(device)
labels = labels.to(device)
with torch.no_grad():
  pre_label = net(images)
  pre_label = torch.argmax(pre_label, dim=1)
  acc = (pre_label==labels).sum()/torch.tensor(labels.size()[0], dtype=torch.float32)
  print(acc)
總結
本節(jié)我們了解了標準化數(shù)據(jù)·��、卷積的原理���、簡答的構建了一個網(wǎng)絡�,并讓它去識別手寫體����,也是對前面章節(jié)的總匯了
到此這篇關于超詳細PyTorch實現(xiàn)手寫數(shù)字識別器的示例代碼的文章就介紹到這了,更多相關PyTorch 手寫數(shù)字識別器內容請搜索腳本之家以前的文章或繼續(xù)瀏覽下面的相關文章希望大家以后多多支持腳本之家!
您可能感興趣的文章:- pytorch 利用lstm做mnist手寫數(shù)字識別分類的實例
- 詳解PyTorch手寫數(shù)字識別(MNIST數(shù)據(jù)集)
- PyTorch CNN實戰(zhàn)之MNIST手寫數(shù)字識別示例
- Pytorch實現(xiàn)圖像識別之數(shù)字識別(附詳細注釋)