哈嘍大家好,這里是滑稽研究所�。看過我們圖像處理系列的朋友����,應該知道識別答題卡那期文章�。其中利用opencv框架,完美的實現(xiàn)了答題卡填涂區(qū)域的識別�����。在后臺有小伙伴想要我完善一下判斷選項對錯并打分的功能����,本期我們就來實現(xiàn)一下。
那么我們來復習一下往期的代碼原理��。我們需要對圖片素材進行灰度化處理�、透視變換�、輪廓檢測、腐蝕膨脹處理����、區(qū)域分割、邊框計算��、區(qū)域計算�����。實際上我們是通過像素面積的過濾�����、填涂區(qū)域優(yōu)化和獲取選項坐標來完成答題卡的識別的。
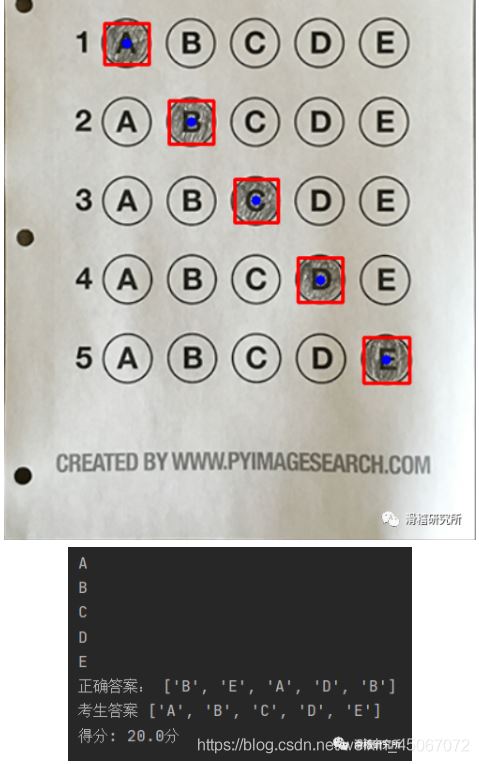
素材:
那么在獲取到答題卡的填涂區(qū)域之后就好辦了���。我們首先分隔答題卡��,去除干擾項����,然后把不同的區(qū)域打上標簽。我們的答題卡是自上而下排序的���。那么我們獲取到的填涂項的x坐標即橫坐標就派上了用場。選項A~E一定是占據(jù)了五個不同的區(qū)域�。我們已經為不同區(qū)域打上了標簽。剩下的就是交給我們的if判斷語句了���。這時我們已經為填涂項賦上了實際的意義。即從像素坐標轉換成了具有實際意義的選項����。
那y坐標就沒有用了嗎?非也�����。經過上面的處理我們只是得到了填涂區(qū)域對應的選項���。但是我們還沒有進行排序��。大家知道無序的選項是沒有意義的�����。而剛剛我們說了該答題卡的題號順序是自上而下的��。因為我們遍歷選項時�,是同時得到x�、y坐標的�,因此我們可以保證得到的坐標是配對的���。
其中橫縱坐標分別填入兩個list中�����,然后使用zip方法合并list。這時我們再按照每個list的第二個元素也就是縱坐標進行由小到大的排序���,就可以得到正確的順序��。
這時我們才真正獲取到了需要的數(shù)據(jù)��。即考生填涂的選項順序,我們再新建一個list放正確的答案�����,與考生的答案進行對比�,經計算得出考生的正確率,并給出分數(shù)���。
好�,思路清晰�,上代碼!
import cv2
import numpy as np
path = './test_01.png'
img = cv2.imread(path)
imgGray = cv2.cvtColor(img,cv2.COLOR_BGR2GRAY)
imgBlur = cv2.GaussianBlur(imgGray,(3,3),1)
imgCanny = cv2.Canny(imgBlur,100,120)
cv2.imshow("O", imgCanny)
imgContour = img.copy()
cnts = cv2.findContours(imgCanny, cv2.RETR_EXTERNAL, cv2.CHAIN_APPROX_NONE)[0]
for cnt in cnts:
area = cv2.contourArea(cnt)
# 這個輸出各個輪廓的面積
#print(area)
#
if area >= 500:
cv2.drawContours(imgContour, cnt, -1, (255, 0, 0), 3)
peri = cv2.arcLength(cnt, True)
# 找出輪廓的突變值
approx = cv2.approxPolyDP(cnt, 0.02 * peri, True)
# approx找到的是一個輪廓有幾個突變值����,有幾個角就會有幾個突變值
# 返回的是一個list�����,輸出他的長度�����,就可以知道到底有幾個角
#print(approx)
a1,a2,a3,a4 = list(approx[0][0]),list(approx[1][0]),list(approx[2][0]),list(approx[3][0])
#cv2.imshow("Canny Image",imgContour)
mat1 = np.array([a1,a2,a3,a4],dtype=np.float32)
#透視變換
#計算矩形寬高
width = 402#int(((a4[0]-a1[0])+(a3[0]-a2[0]))/2)
height = 518#int(((a2[1]-a1[1])+(a3[1]-a4[1]))/2)
#計算還原后的坐標
new_a1 = [0,0]
new_a2 = [0,height]
new_a3 = [width,height]
new_a4 = [width,0]
mat2 = np.array([new_a1,new_a2,new_a3,new_a4],dtype=np.float32)
#計算變換矩陣
mat3 = cv2.getPerspectiveTransform(mat1,mat2)
#進行透視變換
res = cv2.warpPerspective(imgCanny,mat3,(width,height))
res1 = cv2.warpPerspective(img,mat3,(width,height))
imgxx = cv2.cvtColor(res1,cv2.COLOR_BGR2GRAY)
binary = cv2.threshold(imgxx,0,255,cv2.THRESH_BINARY_INV | cv2.THRESH_OTSU )[1]
#變換完成
#cv2.imshow("Output",res1)
cntss = cv2.findContours(res, cv2.RETR_EXTERNAL, cv2.CHAIN_APPROX_NONE)[0]
for cnt1 in cntss:
area1 = cv2.contourArea(cnt1)
# 這個輸出各個輪廓的面積
#print(area)
#
if area1 >= 1500 and area1=1700:
#把圓的輪廓畫成黑色
cv2.drawContours(binary, cnt1, -1, (0, 0, 0), 10)
kernel = np.ones((5, 5), np.uint8)
imgDialation = cv2.dilate(binary, kernel, iterations=1)
cv2.imshow("Out", imgDialation)
cntsss = cv2.findContours(imgDialation, cv2.RETR_EXTERNAL, cv2.CHAIN_APPROX_NONE)[0]
l1 = []
l2 = []
l3 = ['B','E','A','D','B']
for cnt2 in cntsss:
area2 = cv2.contourArea(cnt2)
#print(area)
if area2 = 1200 and 800=area2:
#cv2.drawContours(res1, cnt, -1, (0, 255, 0), 5)
#輪廓長
peri = cv2.arcLength(cnt2, True)
# 找出輪廓的突變值
approx1 = cv2.approxPolyDP(cnt2, 0.02 * peri, True)
x, y, w, h = cv2.boundingRect(approx1)
#外接矩形
#print(x+w//2,y+h//2)
m = x+w//2
n = y+h//2
l1.append(m)
l2.append(n)
#拼接兩個一維列表�,使x,y坐標配對��。
mix1 = list(zip(l1,l2))
#按列表第二個元素升序�����,即按y值由小到大排列����。
#這是我們得到的答案為正確順序����。
mix1.sort(key=lambda x: x[1])
if 400>x>80 and 50y350:
cv2.rectangle(res1, (x, y), (x + w, y + h), (0, 0, 255), 2)
#圓心
# (圖像���,x.y位置�,半徑�,顏色�,輪廓粗細)
cv2.circle(res1, (x+w//2,y+h//2), 1, (255, 0, 0), 5)
l4 = []
for i in mix1:
if 75 i[0] 130:
print("A")
l4.append('A')
elif 130 i[0] 185:
print("B")
l4.append('B')
elif 185 i[0] 240:
print("C")
l4.append('C')
elif 240 i[0] 295:
print("D")
l4.append('D')
elif 295 i[0] 350:
print("E")
l4.append('E')
print('正確答案:',l3)
print('考生答案',l4)
h = 0
for i in range(0, len(l3)):
if l3[i] == l4[i]:
h=h+1
print('得分:',str(h/5*100)+'分')
cv2.imshow("cc Image",res1)
cv2.imshow("dd Image",binary)
cv2.waitKey(0)