一、前言
六邊形能力圖如下����,由 6 個 六邊形組成,每一個頂點代表其在某一方面的能力��。這篇文章我們就來看看如何基于 canvas 去繪制這么一個六邊形能力圖�����。當然�,你也可以基于其他開源的 js 方案來實現(xiàn),如 EChars.js 等����。

二、六邊形繪制基礎
六邊形能力圖有 6 個 六邊形組成�,那我們只要繪制出一個,另外 5 個則依次減小六邊形的邊長即可���。那我們首先來分析一下��,如何繪制出一個六邊形�����。
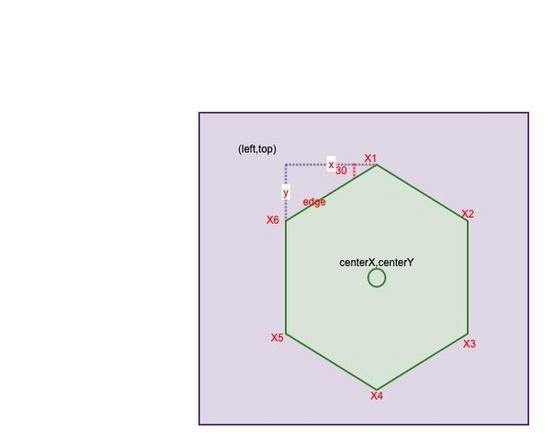
如上圖����,繪制一個六邊形有以下幾個關鍵點:
1.紫色矩形區(qū)域我們可以看成是 canvas 的畫布。其大小可以認為是 (width,height)���。center(centerX,centerY) 是其中心點�,即 (width / 2, height / 2)��。
2.繪制六邊形的關鍵是計算出它的 6 個頂點的坐標���。而如上圖所示�����,這里面最關鍵的又是計算出六邊形所在矩形區(qū)域的左上角坐標(left,top)���。對照上圖,(left,top) 的計算公式如下���。
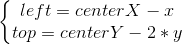
要計算出 (left,top) 需要先計算出 x,y �����。而 x,y 的值與六邊形的邊長有關�。
3.如上的 x,y 的計算公式為
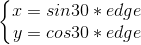
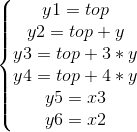
4.因此�����,X1(x1,y1),X2(x2,y2),X3(x3,y3),X4(x4,y4),X5(x5,y5),X6(x6,y6) 的坐標計算為
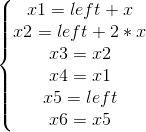
因此�,得到繪制六邊形的代碼為:
function computeHexagonPoints(width, height, edge) {
    let centerX = width / 2;
    let centerY = height / 2;
    let x = edge * Math.sqrt(3) / 2;
    let left = centerX - x;
    let x1,x2,x3,x4,x5,x6;
    let y1,y2,y3,y4,y5,y6;
    x5 = x6 = left;
    x2 = x3 = left + x * 2;
    x1 = x4 = left + x;

    let y = edge / 2;
    let top = centerY - 2 * y;
    y1 = top;
    y2 = y6 = top + y;
    y3 = y5 = top + 3 * y;
    y4 = top + 4 * y;

    let points = new Array();
    points[0] = [x1, y1];
    points[1] = [x2, y2];
    points[2] = [x3, y3];
    points[3] = [x4, y4];
    points[4] = [x5, y5];
    points[5] = [x6, y6];
    return points;
  }
三、繪制六維能力圖
3.1 繪制 6 個六邊形
基于 canvas 繪制���,首先就是需要獲取 context�����。
_context = canvas.getContext('2d');
而繪制的話�,已經(jīng)知道 6 個頂點了�����,那只需要將這 6 個點用連線的方式連接起來就可以了����。主要用到 moveTo(x,y) 和 lineTo(x,y) 兩個方法���。這里總共需要繪制 6 個六邊形,那只要按等比例減小 edge 的值就可以了�。因此繪制六邊形能力圖的主要代碼如下。
function drawHexagonInner(edge) {
    _context.strokeStyle = _color;
    for (var i = 0; i < 6; i++) {
      _allPoints[i] = computeHexagonPoints(_width, _height, edge - i * edge / 5);
      _context.beginPath();
      _context.moveTo(_allPoints[i][5][0],_allPoints[i][5][1]);
      for (var j = 0; j < 6; j++) {
        _context.lineTo(_allPoints[i][j][0],_allPoints[i][j][1]);
      }
      _context.closePath();
      _context.stroke();
    }
  }
代碼中還有 3 個相關的 API�。beginPath() 和 closePath() 主要就是繪制得到一個封閉的路徑。stroke() 主要是得到一個鏤空的形狀�����。當然��,相應的就有 fill() 得到填充的形狀�����。
3.2 繪制 3 條直線
繪制那 3 條直線也是比較簡單的�����,只要將 X1和X4 連接�����,將X2 和 X5 相連,將 X3 和 X6 相連�。代碼如下:
function drawLines() {
    _context.beginPath();
    _context.strokeStyle = _color;
    for (let i = 0; i < 3; i++) {
      _context.moveTo(_allPoints[0][i][0],_allPoints[0][i][1]); //1-4
      _context.lineTo(_allPoints[0][i+3][0],_allPoints[0][i+3][1]); //1-4
      _context.stroke();
    }
    _context.closePath();
  }
3.3 繪制覆蓋圖
6 個頂點代表了六種能力,比如這里的各科成績����,把六種能力封閉成一個閉合路徑并填充則稱為覆蓋圖����。要繪制出覆蓋圖,這里需要計算出六個頂點����。6 個頂點可以通過最外圍的六邊形的 6 個頂點和中心點來計算。簡單來說就是通過能力得分�,在頂點到中心距離的占比來計算。計算公式如下��。

代碼如下
/**
   * 畫覆蓋物
   */
  function drawCover() {

    let tmpCoverPoints = _allPoints[0];
    _coverPoints = [];
    console.log("coverPoints ",tmpCoverPoints)

    let centerX = _width / 2;
    let centerY = _height / 2;
    for (let i = 0; i < tmpCoverPoints.length; i++) {
      _coverPoints.push([
        centerX + (tmpCoverPoints[i][0] - centerX) * (_data[i].score / 100.0),
        centerX + (tmpCoverPoints[i][1] - centerY) * (_data[i].score / 100.0)
      ]);
    }
    console.log("newCoverPoints ",_coverPoints)
    _context.beginPath();
    _context.fillStyle = 'rgba(90,200,250,0.4)';
    _context.moveTo(_coverPoints[5][0],_coverPoints[5][1]); //5
    for (var j = 0; j < 6; j++) {
      _context.lineTo(_coverPoints[j][0],_coverPoints[j][1]);
    }
    _context.stroke();
    _context.closePath();
    _context.fill();
  }
/**
   * 描點
   * @param pointRadius
   */

  function drawPoints(pointRadius) {
    _context.fillStyle = _color;
    for (let i = 0; i < _coverPoints.length; i++) {
      _context.beginPath();
      _context.arc(_coverPoints[i][0],_coverPoints[i][1],pointRadius,0,Math.PI*2);
      _context.closePath();
      _context.fill();
    }
  }
3.4 最后來繪制文本
繪制文本也是用的最外圍的 6 個頂點的坐標���。而用的 API 是 fillText(text,x,y)��,其中 x,y 代碼文字繪制起點���,但注意,不是文字所在矩形框的左上角,應該在左下角的大概位置���。準確來說是文字的基線位置�,這個在其他的GUI系統(tǒng)中也是一樣��,當然這里不追求那么細節(jié)了����,就認為是左下角位置吧。
因此���,對于不同側的文字����,其起點坐標也是不一樣���。如左側的文字至少應該是左側的頂點 x 減去文字的寬度�。再比如�,上下兩側的文字與頂點中相對居中對齊的,因此計算方法是 x 減去文字寬度的一半���。代碼的實現(xiàn)分為了上下左右來進行不同的繪制�。
代碼如下,看著有點長�,但其實是很簡單的。
/**
   * 繪制上側的文字
   * @param text
   * @param pos
   */
  function drawUpText(item, pos) {
    let nameMeasure = _context.measureText(item.name);
    let scoreMeasure = _context.measureText(item.score);

    _context.fillStyle = '#8E8E8E';
    _context.fillText(item.name, pos[0] - nameMeasure.width / 2,pos[1] - 26);
    _context.fillStyle = '#212121';
    _context.fillText(item.score, pos[0] - scoreMeasure.width / 2,pos[1] - 10);

  }
/**
   * 繪制下側的文字
   * @param text
   * @param pos
   */
  function drawDownText(item, pos) {

    let nameMeasure = _context.measureText(item.name);
    let scoreMeasure = _context.measureText(item.score);

    _context.fillStyle = '#8E8E8E';
    _context.fillText(item.name, pos[0] - nameMeasure.width / 2,pos[1] + 16);
    _context.fillStyle = '#212121';
    _context.fillText(item.score, pos[0] - scoreMeasure.width / 2,pos[1] + 32);
  }
/**
   * 繪制左側的文字
   * @param text
   * @param pos
   */
  function drawLeftText(item, pos) {

    let nameMeasure = _context.measureText(item.name);
    let scoreMeasure = _context.measureText(item.score);

    _context.fillStyle = '#8E8E8E';
    _context.fillText(item.name, pos[0] - nameMeasure.width - 10,pos[1]);
    _context.fillStyle = '#212121';
    _context.fillText(item.score, pos[0] - 10 - (nameMeasure.width + scoreMeasure.width) / 2,pos[1] + 16);

  }
/**
   * 繪制右側的文字
   * @param text
   * @param pos
   */
  function drawRightText(item, pos) {
    let nameMeasure = _context.measureText(item.name);
    let scoreMeasure = _context.measureText(item.score);

    _context.fillStyle = '#8E8E8E';
    _context.fillText(item.name, pos[0] - nameMeasure.width + 26,pos[1]);
    _context.fillStyle = '#212121';
    _context.fillText(item.score, pos[0] + 26 - (nameMeasure.width + scoreMeasure.width) / 2,pos[1] + 16);
  }
/**
   * 繪制所有文本
   */
  function drawText() {

    _context.fillStyle = '#8E8E8E';
    _context.strokeStyle = _color;

    let textPos = _allPoints[0];

    for (let i = 0; i < textPos.length; i++) {

      let item = _data[i];
      let pos = textPos[i];
      if(i == 0) {
        drawUpText(item, pos);
      } else if(i == 1 || i == 2) {
        drawRightText(item, pos);
      } else if(i == 3) {
        drawDownText(item, pos);
      } else if(i == 4 || i == 5) {
        drawLeftText(item, pos);
      }
    }
  }
四�����、總結
文章主要是基于 canvas 自定義一個六邊形能力圖�����,而這個能力的圖的關鍵部分是對于六邊形的繪制�,而六邊形的繪制又在于計算出 6 個頂點���。有了 6 個頂點�,再繪制其他的邊�,文本,覆蓋區(qū)域等都基于這個 6 個頂點進行相應的繪制即可����。
以上就是本文的全部內容,希望對大家的學習有所幫助���,也希望大家多多支持腳本之家�����。