前言
App自動化測試中有兩個很重要的操作����,屏幕滑動與繪制手勢密碼�����。目前很多App在啟動時��,都存在啟動時的引導動畫或者加載上下文內(nèi)容時需要手動上滑或者下滑加載頁面�,所以在自動化測試的過程中模擬手的滑動操作看起來就很重要了;第二個比較重要的是模擬手動繪制九宮格完成手勢密碼的設(shè)置��,這種手勢密碼在我了解的范圍內(nèi)���,大多在金融類的app中最常見�,還有一些對用戶信息保密性較好的app中�����,所以,模擬繪制手勢密碼也是app自動化測試中必須掌握的操作���,那么接下來我們就開始講解兩種操作該如何實現(xiàn), 在進入正題之前�����,你還應該知道�����,手機中橫縱坐標的原點是從屏幕的左上角頂點(0, 0)的位置開始的
滑動屏幕
swipe方法
模擬滑動屏幕的操作�,我們通過swipe方法實現(xiàn)��,先看一下這個方法的源代碼
def swipe(self, start_x, start_y, end_x, end_y, duration=None):
  """Swipe from one point to another point, for an optional duration.
  Args:
   start_x (int): x-coordinate at which to start
   start_y (int): y-coordinate at which to start
   end_x (int): x-coordinate at which to stop
   end_y (int): y-coordinate at which to stop
   duration (:obj:`int`, optional): time to take the swipe, in ms.
  Usage:
   driver.swipe(100, 100, 100, 400)
  Returns:
   `WebElement`
  """
  # `swipe` is something like press-wait-move_to-release, which the server
  # will translate into the correct action
  action = TouchAction(self)
  action \

   .press(x=start_x, y=start_y) \

   .wait(ms=duration) \

   .move_to(x=end_x, y=end_y) \

   .release()
  action.perform()
  return self
參數(shù)
start_x, start_y : 表示開始滑動時的初始坐標�����,也就是從哪里開始滑動
end_x, end_y : 表示滑動后的坐標�����,也就是滑動到哪里
duration: : 表示滑動過程的時間間隔,模擬操作時�����,我們最好設(shè)置個時間間隔����,避免由于代碼運行太快���,而真機或者模擬器反應比較慢����,而操作失敗��,單位以毫秒計算
通過源碼����,我們發(fā)現(xiàn)swipe方法實際上是使用TouchAction實現(xiàn)的,這個類在后面我們?nèi)匀粫褂?���,主要是模擬一些觸屏動作
實現(xiàn)思路
大家可以想象一下,平時我們滑動屏幕時���,是如何操作的��?例如向左滑動屏幕���,我們往往是把手放在屏幕的右側(cè)����,然后按住屏幕向左滑動�����,那么代碼如何知道我們從屏幕的哪個位置開始訥�?那就是坐標了,我們可以先獲取屏幕的寬�,高,然后按照它的比例計算鼠標的位置坐標�����,我這里取的起始坐標點為屏幕寬度的0.9倍����,高度的0.5倍,大概就是我們實際中滑屏時手指的操作位置�����。大家可以根據(jù)下面播放的動畫觀察鼠標開始的大概位置和結(jié)束位置
接下來我們開始模擬動畫中鼠標的操作(人手的操作,我用的模擬器所以有鼠標)
首先我們通過get_window_size()方法獲取屏幕的寬和高(這個方法返回一個字典)�,然后計算鼠標的初始位置和結(jié)束為止
def get_phone_size(self):
  """獲取屏幕的大小"""
  width = self.driver.get_window_size()['width'] # 獲取屏幕的寬
  height = self.driver.get_window_size()['height'] # 獲取屏幕的高
  return width, height
通過模擬動畫不難看出,鼠標大概從起始點坐標(屏幕寬的3/4��,高的1/2)位置滑動到結(jié)束點坐標(屏幕寬1/4�,高1/2)����,ok,接下來通過swipe()方法實現(xiàn)滑動操作
def swipe_left(self, duration=300):
  """左滑"""
  width, height = self.get_phone_size
     start = width * 0.9, height * 0.5
  end = width * 0.1, height * 0.5
  return self.driver.swipe(*start, *end, duration)
 def swipe_right(self, duration=300):
  """右滑"""
  width, height = self.get_phone_size
  start = width * 0.9, height * 0.5
  end = width * 0.1, height * 0.5
  return self.driver.swipe(*start, *end, duration)
 def swipe_up(self, duration):
  """上滑"""
  width, height = self.get_phone_size
  start = width * 0.9, height * 0.5
  end = width * 0.1, height * 0.5
  return self.driver.swipe(*start, *end, duration)
 def swipe_down(self, duration):
  """下滑"""
  width, height = self.get_phone_size
  start = width * 0.9, height * 0.5
  end = width * 0.1, height * 0.5
  return self.driver.swipe(*start, *end, duration)
方法優(yōu)化
以上每一個方法調(diào)用一次只能滑動一次�����,而且不同的滑動方向需要調(diào)用不同的方法���,使用時比較麻煩����。所以我們可以優(yōu)化一下代碼�,通過調(diào)用一個函數(shù)實現(xiàn)不同次數(shù),不同方向的滑動
使用for循環(huán)實現(xiàn)連續(xù)的滑動����,引入direction參數(shù)�,結(jié)合字典及反射機制���,實現(xiàn)根據(jù)不同的參數(shù)執(zhí)行不同滑動方向的方法��,傳遞num參數(shù)控制滑動的次數(shù)���,具體代碼如下
def skip_welcome_page(self, direction, num=3):
  """
  滑動頁面跳過引導動畫
  :param direction: str 滑動方向,left, right, up, down
  :param num: 滑動次數(shù)
  :return:
  """
  direction_dic = {
   "left": "swipe_left",
   "right": "swipe_right",
   "up": "swipe_up",
   "down": "swipe_down"
  }
  time.sleep(3)
  if hasattr(self, direction_dic[direction]):
   for _ in range(num):
    getattr(self, direction_dic[direction])() # 使用反射執(zhí)行不同的滑動方法
  else:
   raise ValueError("參數(shù){}不存在, direction可以為{}任意一個字符串".
        format(direction, direction_dic.keys()))
以上就是所有滑動屏幕的操作了���,具體效果����,我們后面再看(你也可以先試試)
手勢密碼
TouchAction類
模擬手勢密碼的繪制我們使用TouchAction類���,這個類提供了短按壓press()方法���,wait()方法,move_to()方法�,release()方法,perform()方法等常用方法�����,下面我簡單說明一下這幾個方法的作用
press(element, x, y) : 其中element參數(shù)是一個元素對象,當element不為空時�,x和y必須位None,如果element為None時��,x如果不為None�,那么y也不能位None,也就是說在安卓操作系統(tǒng)中���,element和(x,y)必要傳遞一個,蘋果系統(tǒng)可以不傳��,這里不做介紹
wait(duration) : duration是時間����,以毫秒為單位,這個方法的作用是等待一段時間�����,和sleep的作用類似�,唯一區(qū)別sleep不能被TouchAtion對象訪問
release() : 這個方法的作用是結(jié)合press等按壓動作使用的,表示抬起動作
perform():這個方法的作用是使所有的按壓及等待��,release等動作生效
實現(xiàn)思路
模擬大多app中的手勢設(shè)置密碼操作會遇見兩種情況,一種是9宮格中每一個點的元素都可以通過定位表達式定位到�,另一種是每個點無法通過定位表達式定位到的,只能定位到整體9宮格元素����,每個點只能通過獲取坐標的方式定位,那么我們今天模擬繪制手勢密碼的情況就是第二種���,如果這種掌握了�����,那么第一種更簡單����,下面我們分析一下該如何獲取每一個點的坐標�,先來看下面的圖
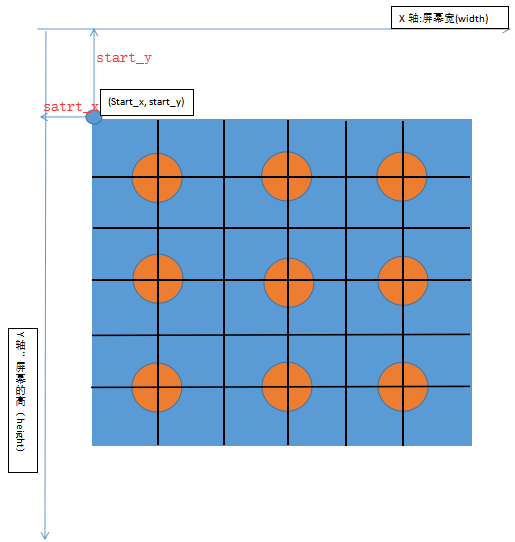
上圖中的x軸,y軸是手機的坐標表示方式����,請區(qū)別數(shù)學中的二維坐標,其中x軸方向表示手機屏幕的寬度width��,y軸方向表示屏幕的高度height�����,原點為(0, 0); 藍色方框代表9宮格手勢操作的整體元素(內(nèi)部包含9個點),start_x, start_y 代表9宮格元素的起始坐標點����,start_x也是9宮格起始點距離y軸的距離,start_y也是9宮格起始點距離x軸的距離��,請大家一定理解這幾個值的關(guān)系���,下面我們可以通過WebElement對象的rect方法獲取9宮格元素的寬�,高及起始點坐標
def get_element_size_location(element):
  width = element.rect["width"] # 9宮格元素的寬度
  height = element.rect["height"] # 9宮格坐標的高度
  # 9宮格元素的起始坐標點
  start_x = element.rect["x"]
  start_y = element.rect["y"]
  return width, height, start_x, start_y
除了使用rect方法外���,你還可以使用location和size方法分別獲取元素的起始點坐標和寬,高����,兩個方法同樣返回字典
element.location ->{"x": start_x, "y": start_y}
element.size ->{"width": width, "height": height}
接下來我們通過9宮格元素的width,height���,start_x, start_y分別計算每個點的坐標�, 我們按照上圖����,把9宮格元素的width和height分別等分為6等分
前3個點(1, 2, 3)的坐標分別是
width, height, start_x, start_y = self.get_element_size_location(element)
point_1 = {"x": int(start_x + width * (1 / 6) * 1), "y": int(start_y + height * (1 / 6) * 1)}
point_2 = {"x": int(start_x + width * (1 / 6) * 3), "y": int(start_y + height * (1 / 6) * 1)}
point_3 = {"x": int(start_x + width * (1 / 6) * 5), "y": int(start_y + height * (1 / 6) * 1)}
中間3個點(4, 5, 6)的坐標分別為
point_4 = {"x": int(start_x + width * (1 / 6) * 1), "y": int(start_y + height * (1 / 6) * 3)}
point_5 = {"x": int(start_x + width * (1 / 6) * 3), "y": int(start_y + height * (1 / 6) * 3)}
point_6 = {"x": int(start_x + width * (1 / 6) * 5), "y": int(start_y + height * (1 / 6) * 3)}
最后3個點(7���, 8, 9)的坐標分別為
point_7 = {"x": int(start_x + width * (1 / 6) * 1), "y": int(start_y + height * (1 / 6) * 5)}
point_8 = {"x": int(start_x + width * (1 / 6) * 3), "y": int(start_y + height * (1 / 6) * 5)}
point_9 = {"x": int(start_x + width * (1 / 6) * 5), "y": int(start_y + height * (1 / 6) * 5)}
下面我們使用TouchAction類中的move_to,wait,release,perform方法實現(xiàn)從一個點移動到另一個點���,進而實現(xiàn)模擬手勢密碼的連線操作(鏈接1-2-3-6-9)
TouchAction(driver).press(x=point_1["x"], y=point_1["y"]).wait(300)\

 .move_to(x=point_2["x"], y=point_2["y"]).wait(500)\

 .move_to(x=point_3["x"], y=point_3["y"]).wait(500)\

 .move_to(x=point_6["x"], y=point_6["y"]).wait(500)\

 .move_to(x=point_9["x"], y=point_9["y"]).wait(500).release().perform()
完整代碼
不包含滑動屏幕的代碼
base.py
"""
------------------------------------
@Time : 2019/8/6 20:22
@Auth : linux超
@File : base.py
@IDE : PyCharm
@Motto: Real warriors,dare to face the bleak warning,dare to face the incisive error!
@QQ : 28174043@qq.com
@GROUP: 878565760
------------------------------------
"""
from appium.webdriver import WebElement
from appium.webdriver.common.touch_action import TouchAction
from appium.webdriver.webdriver import WebDriver
from selenium.webdriver.support.wait import WebDriverWait
from selenium.common.exceptions import NoSuchElementException, TimeoutException
class Base(object):
 def __init__(self, driver: WebDriver):
  self.driver = driver
 @staticmethod
 def get_element_size_location(element):
  width = element.rect["width"]
  height = element.rect["height"]
  start_x = element.rect["x"]
  start_y = element.rect["y"]
  return width, height, start_x, start_y
 def gesture_password(self, element: WebElement):
  width, height, start_x, start_y = self.get_element_size_location(element)
  point_1 = {"x": int(start_x + width * (1 / 6) * 1), "y": int(start_y + height * (1 / 6) * 1)}
  point_2 = {"x": int(start_x + width * (1 / 6) * 3), "y": int(start_y + height * (1 / 6) * 1)}
  point_3 = {"x": int(start_x + width * (1 / 6) * 5), "y": int(start_y + height * (1 / 6) * 1)}
  point_4 = {"x": int(start_x + width * (1 / 6) * 1), "y": int(start_y + height * (1 / 6) * 3)}
  point_5 = {"x": int(start_x + width * (1 / 6) * 3), "y": int(start_y + height * (1 / 6) * 3)}
  point_6 = {"x": int(start_x + width * (1 / 6) * 5), "y": int(start_y + height * (1 / 6) * 3)}
  point_7 = {"x": int(start_x + width * (1 / 6) * 1), "y": int(start_y + height * (1 / 6) * 5)}
  point_8 = {"x": int(start_x + width * (1 / 6) * 3), "y": int(start_y + height * (1 / 6) * 5)}
  point_9 = {"x": int(start_x + width * (1 / 6) * 5), "y": int(start_y + height * (1 / 6) * 5)}
  TouchAction(self.driver).press(x=point_1["x"], y=point_1["y"]).wait(300) \

   .move_to(x=point_2["x"], y=point_2["y"]).wait(500) \

   .move_to(x=point_3["x"], y=point_3["y"]).wait(500) \

   .move_to(x=point_6["x"], y=point_6["y"]).wait(500) \

   .move_to(x=point_9["x"], y=point_9["y"]).wait(500).release().perform()
 def find_element(self, locator: tuple, timeout=30) -> WebElement:
  wait = WebDriverWait(self.driver, timeout)
  try:
   element = wait.until(lambda driver: driver.find_element(*locator))
   return element
  except (NoSuchElementException, TimeoutException):
   print('no found element {} by {}', format(locator[1], locator[0]))
if __name__ == '__main__':
 pass
測試代碼
test_gesture_password.py

import time
import unittest
from appium import webdriver
from appium.webdriver.common.mobileby import MobileBy
from base import Base
class TestGesture(unittest.TestCase):
 def setUp(self):
  desired = {
   "automationName": "uiautomator1",
   "platformName": "Android",
   "platformVersion": '5.1.1',
   "deviceName": "127.0.0.1:62001",
   "appPackage": "com.xxzb.fenwoo",
   "appActivity": "com.xxzb.fenwoo.activity.addition.WelcomeActivity",
   "app": r"D:\AppAutoTest\appPackage\Future-release-2018.apk",
   "unicodeKeyboard": True, # 屏蔽鍵盤
   "resetKeyboard": True
  }
  self.driver = webdriver.Remote(command_executor="http://127.0.0.1:4723/wd/hub",
          desired_capabilities=desired)
  self.base = Base(self.driver)
 def test_gesture_password(self):
  # 直接切換到手勢密碼頁面
  self.driver.start_activity(app_package="com.xxzb.fenwoo",
         app_activity=".activity.user.CreateGesturePwdActivity")
  commit_btn = (MobileBy.ID, 'com.xxzb.fenwoo:id/right_btn')
  password_gesture = (MobileBy.ID, 'com.xxzb.fenwoo:id/gesturepwd_create_lockview')
  element_commit = self.base.find_element(commit_btn)
  element_commit.click()
  # 9宮格元素
  password_element = self.base.find_element(password_gesture)
  self.base.gesture_password(password_element)
  time.sleep(5) # 為了看效果
 def tearDown(self):
  self.driver.quit()
if __name__ == '__main__':
 unittest.main()
以上就是完整的模擬手勢密碼操作的代碼��, 但是問題來了 �����, 我這里執(zhí)行的時候不成功���,很尷尬,但是我確實看到過別人通過這種獲取每個點的坐標�,從一個點的坐標移動到另一個點的坐標的方式成功畫線了,當然你可以先試試能不能成功再往下看��!
方法重寫
如果上邊的方式你也不成功�,那么就試試下面的方法吧,原理是一樣的��,主要不同點在,move_to方法傳遞的不是每個點的坐標�,而是相對點的坐標,也就是從一個點移動到另一個點的距離坐標�����,例如點1的坐標為(360, 579), 點2的坐標為(580, 579), 那么移動的距離應該是橫向220��,縱向為0���, 傳遞的參數(shù)應該是這樣的move_to(x=220, y=0)(這里傳遞的參數(shù)叫做相對位置坐標���,但是move_to的源碼就是按照我之前的寫法傳參的,具體為啥�,我也不得而知了),修改部分代碼如下
TouchAction(self.driver).press(x=point_1["x"], y=point_1["y"]).wait(300) \

 .move_to(x=point_2["x"]-point_1["x"], y=point_2["y"]-point_1["y"]).wait(500) \

 .move_to(x=point_3["x"]-point_2["x"], y=point_3["y"]-point_2["y"]).wait(500) \

 .move_to(x=point_6["x"]-point_3["x"], y=point_6["y"]-point_3["y"]).wait(500) \

 .move_to(x=point_9["x"]-point_6["x"], y=point_9["y"]-point_6["y"]).wait(500).release().perform()
相對坐標的計算方法:用后一個目標點坐標減去前一個點的坐標即為相對坐標����,你可以把這個段代碼替換一下����,你會發(fā)現(xiàn)確實成功了
代碼優(yōu)化
上述代碼你會發(fā)現(xiàn), 每次繪制的只能是同一個密碼����,如果我想繪制不同的密碼���,那么就必須修改繪制時傳遞的坐標,作為一枚優(yōu)秀的程序員怎么可以這樣訥����?沖這句話,我就必須得想辦法做到繪制任何密碼組合的情況��。我的需求是�����,當我給繪制函數(shù)getsture_password()傳遞不同密碼時(例如這樣的方式getsture_password(1, 2, 3, 6, 9))那么程序應該幫我把1-2-3-6-9鏈接起來�,所以我想到了使用字典,把每個數(shù)字分別對應每一個坐標點����,像下面這樣
def get_password_location(self, element: WebElement) -> dict:
 width, height, start_x, start_y = self.get_element_size_location(element)
 point_1 = {"x": int(start_x + width * (1 / 6) * 1), "y": int(start_y + height * (1 / 6) * 1)}
 point_2 = {"x": int(start_x + width * (1 / 6) * 3), "y": int(start_y + height * (1 / 6) * 1)}
 point_3 = {"x": int(start_x + width * (1 / 6) * 5), "y": int(start_y + height * (1 / 6) * 1)}
 point_4 = {"x": int(start_x + width * (1 / 6) * 1), "y": int(start_y + height * (1 / 6) * 3)}
 point_5 = {"x": int(start_x + width * (1 / 6) * 3), "y": int(start_y + height * (1 / 6) * 3)}
 point_6 = {"x": int(start_x + width * (1 / 6) * 5), "y": int(start_y + height * (1 / 6) * 3)}
 point_7 = {"x": int(start_x + width * (1 / 6) * 1), "y": int(start_y + height * (1 / 6) * 5)}
 point_8 = {"x": int(start_x + width * (1 / 6) * 3), "y": int(start_y + height * (1 / 6) * 5)}
 point_9 = {"x": int(start_x + width * (1 / 6) * 5), "y": int(start_y + height * (1 / 6) * 5)}
 keys = {
  1: point_1,
  2: point_2,
  3: point_3,
  4: point_4,
  5: point_5,
  6: point_6,
  7: point_7,
  8: point_8,
  9: point_9
 }
 return keys
然后我通過另一個方法來實現(xiàn)繪制連線的功能
def gesture_password(self, element: WebElement, *pwd): # pwd是個元組,pwd[0]表示第一個密碼
"""手勢密碼: 直接輸入需要鏈接的點對應的數(shù)字�����,最多9位
pwd: 傳你想連接的點構(gòu)成的密碼�����,如:1, 2, 3, 6, 9
"""
if len(pwd) > 9:
raise ValueError("需要設(shè)置的密碼不能超過9位!")
keys_dict = self.get_password_location(element) # 9個點的坐標組成的字典
start_point = "TouchAction(self.driver).press(x={0}, y={1}).wait(200)".\ # keys_dict[pwd[0]] 得到第一位密碼數(shù)字對應的坐標的字典
format(keys_dict[pwd[0]]["x"], keys_dict[pwd[0]]["y"]) # 起始點的坐標
for index in range(len(pwd)-1): # 0,1,2,3
follow_point = ".move_to(x={0}, y={1}).wait(200)".\
format(keys_dict[pwd[index+1]]["x"] - keys_dict[pwd[index]]["x"],
keys_dict[pwd[index+1]]["y"] - keys_dict[pwd[index]]["y"]) # 后續(xù)的點坐標
start_point = start_point + follow_point # 把起始點的表達式和后續(xù)鏈接的點表達式鏈接在一起組成一個模擬連線的完整過程
full_point = start_point + ".release().perform()" # 完整的過程通過.release().perform()使其生效
return eval(full_point) # 執(zhí)行一串表達式
比較難理解的地方,我已經(jīng)詳細注釋了��,當然���,你可以復制我的代碼先驗證能否繪制成功再分析代碼的實現(xiàn)原理
所有代碼
修改后的繪制手勢密碼代碼滑屏代碼
"""
------------------------------------
@Time : 2019/8/6 20:45
@Auth : linux超
@File : base.py
@IDE : PyCharm
@Motto: Real warriors,dare to face the bleak warning,dare to face the incisive error!
@QQ : 28174043@qq.com
@GROUP: 878565760
------------------------------------
"""
import time
from appium.webdriver import WebElement
from appium.webdriver.common.touch_action import TouchAction
from appium.webdriver.webdriver import WebDriver
from selenium.webdriver.support.wait import WebDriverWait
from selenium.common.exceptions import NoSuchElementException, TimeoutException
class Base(object):
def __init__(self, driver: WebDriver):
self.driver = driver
@property
def get_phone_size(self):
"""獲取屏幕的大小"""
width = self.driver.get_window_size()['width']
height = self.driver.get_window_size()['height']
return width, height
def swipe_left(self, duration=300):
"""左滑"""
width, height = self.get_phone_size
start = width * 0.9, height * 0.5
end = width * 0.1, height * 0.5
return self.driver.swipe(*start, *end, duration)
def swipe_right(self, duration=300):
"""右滑"""
width, height = self.get_phone_size
start = width * 0.1, height * 0.5
end = width * 0.9, height * 0.5
return self.driver.swipe(*start, *end, duration)
def swipe_up(self, duration):
"""上滑"""
width, height = self.get_phone_size
start = width * 0.5, height * 0.9
end = width * 0.5, height * 0.1
return self.driver.swipe(*start, *end, duration)
def swipe_down(self, duration):
"""下滑"""
width, height = self.get_phone_size
start = width * 0.5, height * 0.1
end = width * 0.5, height * 0.9
return self.driver.swipe(*start, *end, duration)
def skip_welcome_page(self, direction, num=3):
"""
滑動頁面跳過引導動畫
:param direction: str 滑動方向�����,left, right, up, down
:param num: 滑動次數(shù)
:return:
"""
direction_dic = {
"left": "swipe_left",
"right": "swipe_right",
"up": "swipe_up",
"down": "swipe_down"
}
time.sleep(3)
if hasattr(self, direction_dic[direction]):
for _ in range(num):
getattr(self, direction_dic[direction])() # 使用反射執(zhí)行不同的滑動方法
else:
raise ValueError("參數(shù){}不存在, direction可以為{}任意一個字符串".
format(direction, direction_dic.keys()))
@staticmethod
def get_element_size_location(element):
width = element.rect["width"]
height = element.rect["height"]
start_x = element.rect["x"]
start_y = element.rect["y"]
return width, height, start_x, start_y
def get_password_location(self, element: WebElement) -> dict:
width, height, start_x, start_y = self.get_element_size_location(element)
point_1 = {"x": int(start_x + width * (1 / 6) * 1), "y": int(start_y + height * (1 / 6) * 1)}
point_2 = {"x": int(start_x + width * (1 / 6) * 3), "y": int(start_y + height * (1 / 6) * 1)}
point_3 = {"x": int(start_x + width * (1 / 6) * 5), "y": int(start_y + height * (1 / 6) * 1)}
point_4 = {"x": int(start_x + width * (1 / 6) * 1), "y": int(start_y + height * (1 / 6) * 3)}
point_5 = {"x": int(start_x + width * (1 / 6) * 3), "y": int(start_y + height * (1 / 6) * 3)}
point_6 = {"x": int(start_x + width * (1 / 6) * 5), "y": int(start_y + height * (1 / 6) * 3)}
point_7 = {"x": int(start_x + width * (1 / 6) * 1), "y": int(start_y + height * (1 / 6) * 5)}
point_8 = {"x": int(start_x + width * (1 / 6) * 3), "y": int(start_y + height * (1 / 6) * 5)}
point_9 = {"x": int(start_x + width * (1 / 6) * 5), "y": int(start_y + height * (1 / 6) * 5)}
keys = {
1: point_1,
2: point_2,
3: point_3,
4: point_4,
5: point_5,
6: point_6,
7: point_7,
8: point_8,
9: point_9
}
return keys
def gesture_password(self, element: WebElement, *pwd):
"""手勢密碼: 直接輸入需要鏈接的點對應的數(shù)字�,最多9位
pwd: 1, 2, 3, 6, 9
"""
if len(pwd) > 9:
raise ValueError("需要設(shè)置的密碼不能超過9位!")
keys_dict = self.get_password_location(element)
start_point = "TouchAction(self.driver).press(x={0}, y={1}).wait(200)". \
format(keys_dict[pwd[0]]["x"], keys_dict[pwd[0]]["y"])
for index in range(len(pwd) - 1): # 0,1,2,3
follow_point = ".move_to(x={0}, y={1}).wait(200)". \
format(keys_dict[pwd[index + 1]]["x"] - keys_dict[pwd[index]]["x"],
keys_dict[pwd[index + 1]]["y"] - keys_dict[pwd[index]]["y"])
start_point = start_point + follow_point
full_point = start_point + ".release().perform()"
return eval(full_point)
def find_element(self, locator: tuple, timeout=30) -> WebElement:
wait = WebDriverWait(self.driver, timeout)
try:
element = wait.until(lambda driver: driver.find_element(*locator))
return element
except (NoSuchElementException, TimeoutException):
print('no found element {} by {}', format(locator[1], locator[0]))
if __name__ == '__main__':
pass
"""
------------------------------------
@Time : 2019/8/6 20:47
@Auth : linux超
@File : test.py
@IDE : PyCharm
@Motto: Real warriors,dare to face the bleak warning,dare to face the incisive error!
@QQ  : 28174043@qq.com
@GROUP: 878565760
------------------------------------
"""
import time
import unittest
from appium import webdriver
from appium.webdriver.common.mobileby import MobileBy
from base import Base
class TestGesture(unittest.TestCase):
  def setUp(self):
    desired = {
      "automationName": "uiautomator1",
      "platformName": "Android",
      "platformVersion": '5.1.1',
      "deviceName": "127.0.0.1:62001",
      "appPackage": "com.xxzb.fenwoo",
      "appActivity": "com.xxzb.fenwoo.activity.addition.WelcomeActivity",
      "app": r"D:\AppAutoTest\appPackage\Future-release-2018.apk",
      "unicodeKeyboard": True, # 屏蔽鍵盤
      "resetKeyboard": True
    }
    self.driver = webdriver.Remote(command_executor="http://127.0.0.1:4723/wd/hub",
                    desired_capabilities=desired)
    self.base = Base(self.driver)
  def test_gesture_password(self):
    self.base.skip_welcome_page('left', 3) # 滑動屏幕
    time.sleep(3) # 為了看滑屏的效果
    self.driver.start_activity(app_package="com.xxzb.fenwoo",
                  app_activity=".activity.user.CreateGesturePwdActivity")
    commit_btn = (MobileBy.ID, 'com.xxzb.fenwoo:id/right_btn')
    password_gesture = (MobileBy.ID, 'com.xxzb.fenwoo:id/gesturepwd_create_lockview')
    element_commit = self.base.find_element(commit_btn)
    element_commit.click()
    password_element = self.base.find_element(password_gesture)
    self.base.gesture_password(password_element, 1, 2, 3, 6, 5, 4, 7, 8, 9)
    time.sleep(5) # 看效果
  def tearDown(self):
    self.driver.quit()
if __name__ == '__main__':
  unittest.main()
測試效果
包含滑動屏幕

總結(jié)
最后�����,我們再總結(jié)一下完成所有的操作需要掌握的知識點
1.滑動屏幕時起始位置和結(jié)束位置應該從哪里開始與結(jié)束��,如何獲取
2.滑動屏幕使用的swipe()方法如何使用
3.實現(xiàn)多次滑動方法的實現(xiàn)原理����,這里用到了反射,其實使用if也可以實現(xiàn)一樣的效果����,但是總感覺if有點low
4.9宮格起始位置與手機屏幕的關(guān)系及每個點的坐標如何計算
5.TouchAction類中的常用方法如何使用
6.理解繪制手勢密碼方法的封裝原理及思路
以上所述是小編給大家介紹的使用swipe方法模擬屏幕滑動與手勢密碼繪制,希望對大家有所幫助,如果大家有任何疑問請給我留言��,小編會及時回復大家的���。在此也非常感謝大家對腳本之家網(wǎng)站的支持�!
如果你覺得本文對你有幫助�,歡迎轉(zhuǎn)載,煩請注明出處����,謝謝!
您可能感興趣的文章:- vue-awesome-swiper 基于vue實現(xiàn)h5滑動翻頁效果【推薦】
- 解決Vue中引入swiper,在數(shù)據(jù)渲染的時候,發(fā)生不滑動的問題
- Swiper 4.x 使用方法(移動端網(wǎng)站的內(nèi)容觸摸滑動)
- swiper 解決動態(tài)加載數(shù)據(jù)滑動失效的問題
- 移動端觸摸滑動插件swiper使用方法詳解
- AngularJS 中使用Swiper制作滾動圖不能滑動的解決方法
- 移動端滑動插件Swipe教程
- 詳解SwipeListView框架實現(xiàn)微信\QQ滑動刪除效果
- Android 簡易手勢密碼開源庫詳解
- Android自定義控件實現(xiàn)手勢密碼